Device to Cloud Getting Started Read data and send messages from and to your LwM2M device
Introduction
In this chapter, you will learn how to use the portal interactively to perform LwM2M operations, such as READ, WRITE, and EXECUTE, in order to:
- Retrieve data from your LwM2M device and forward it to your registered WebHook application endpoints
- Modify configuration settings on your LwM2M device
- Reboot your LwM2M device
👉 Future version of Device to Cloud: support of OBSERVE operation.
Before you can start receiving messages from your device in your application, ensure that you have created a WebHook Application and assigned your LwM2M Device to the Default Device Group of the Application (see How to integrate your application webhook ).
Device, Device Group and Application Model

Of course, you can also use any other Device Group for this purpose. However, ensure that both your Device and your WebHook Application are assigned to this Device Group.
Read LwM2M Objects and Resources from Device
To query data from your LwM2M device interactively, the portal allows you to send an LwM2M READ operation as a so-called Downlink Message to your device. In this example, you will READ the characteristics (called resources in LwM2M) of the temperature sensor of your LwM2M device.
To do so, select your Device in the Devices tab of the portal and execute the Send downlink message function from the context menu of the Device.
Device context menu - Send downlink message
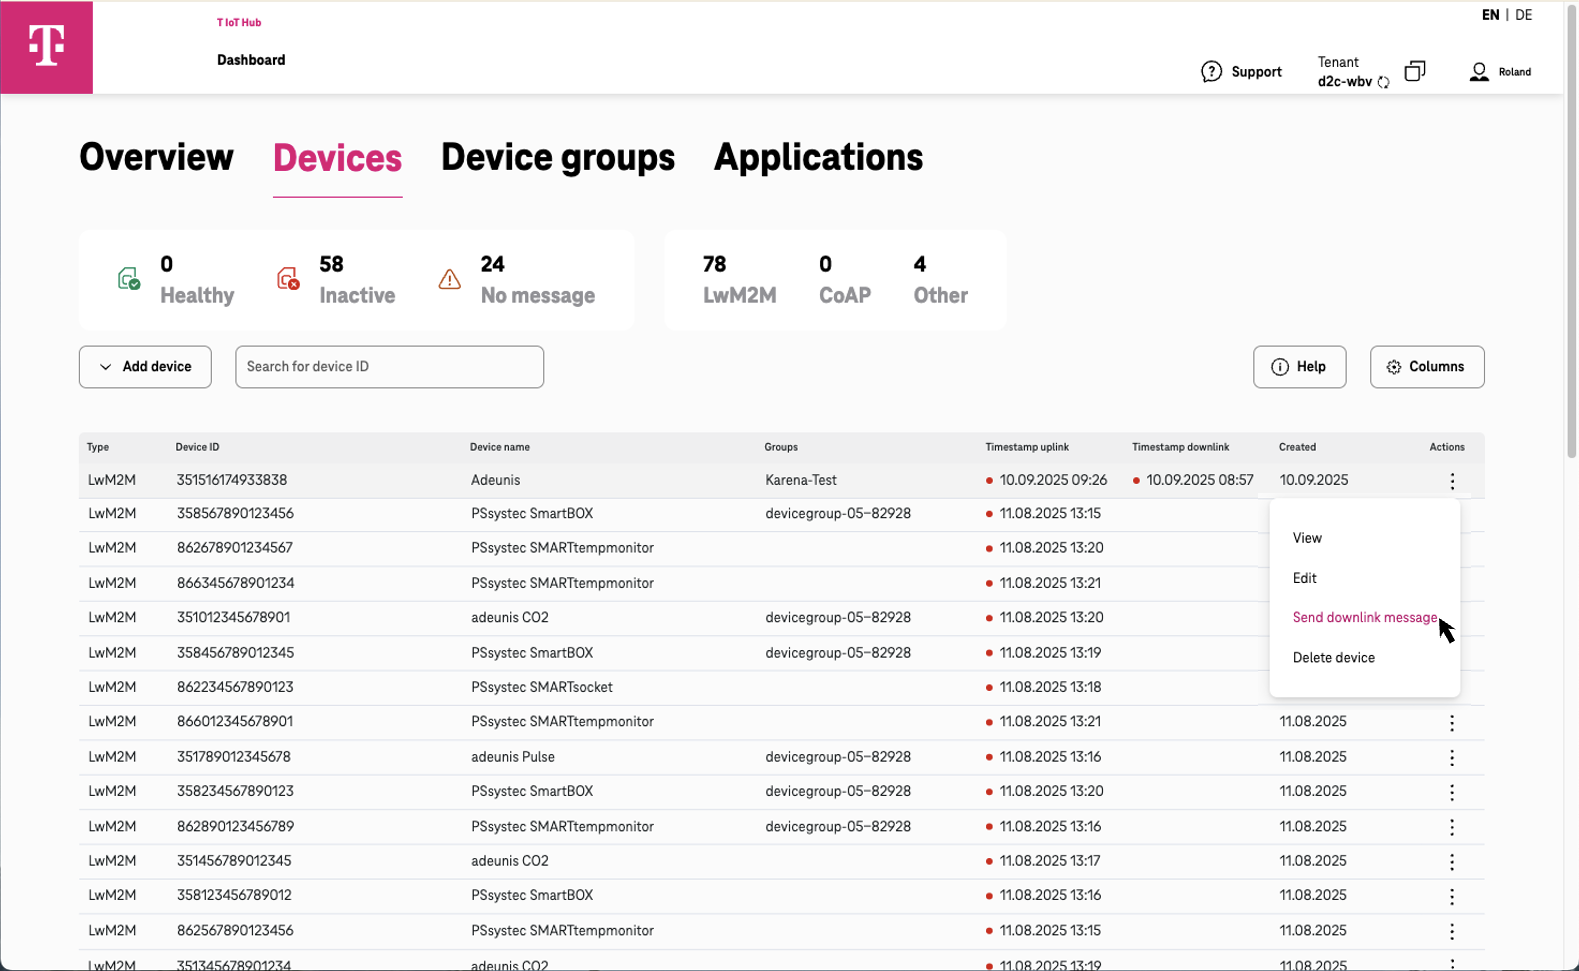
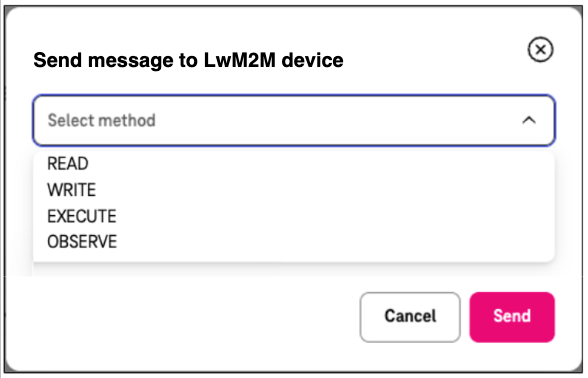
The dialog window to send LwM2M operations to the device is opened. Select the READ method from this dialog window and enter the LwM2M object or resource which you would like to retrieve, as shown in the next two images (in very early versions of Device to Cloud, the READ method is called GET)
Send READ message to LwM2M device - first step
Send READ message to LwM2M device for temperature sensor- second step
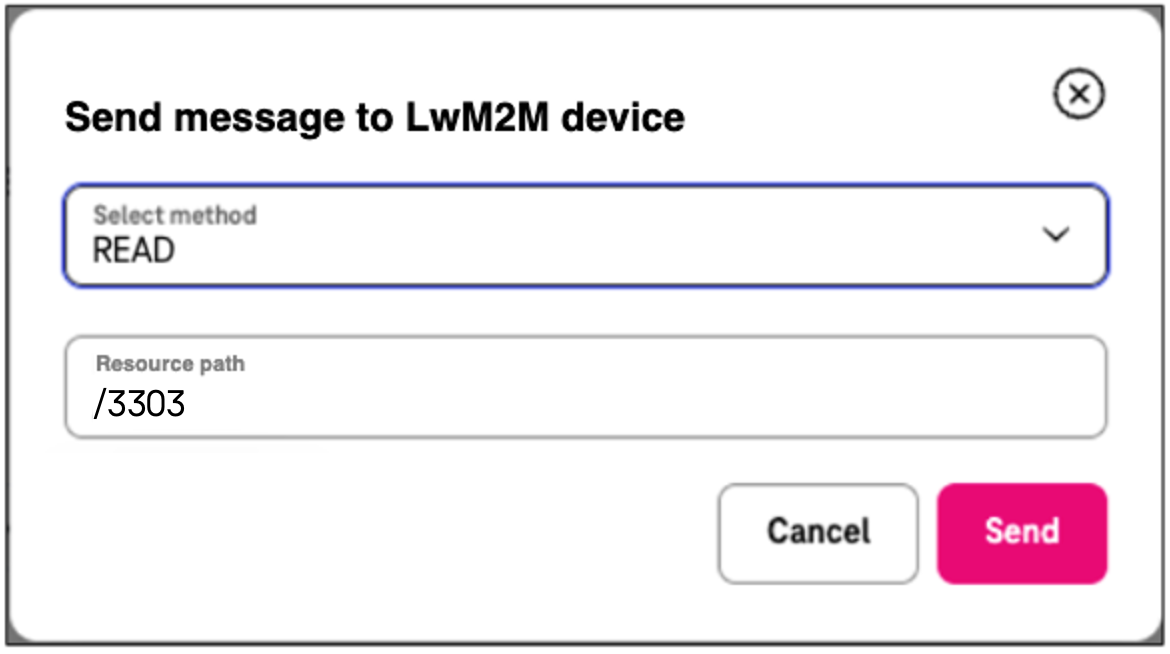
To read all resources of the temperature sensor of a device, use the LwM2M object id /3303 as input for the resource path.
To address any kind of functional or data resource on the device, LwM2M uses the concept of /<object-id>/<instance-id>/<resource-id>. Here are some examples of possible object IDs:
- 3: Basic device information such as device ID, manufacturer, model, etc.
- 3302: Presence sensor and its resources, such as counter and sensor type.
- 3303: Temperature sensor and its resources, such as measured value and unit of measurement.
Currently, there are about 357 LwM2M standard objects defined by the Open Mobile Alliance (OMA), the organization responsible for the LwM2M specifications. For more details about LwM2M and its concepts, refer to the LwM2M Object Registry .
In many cases, hardware vendors define their own LwM2M objects to make the resources of their devices accessible via LwM2M methods. For example:
- The sensor manufacturer Adeunis has defined LwM2M objects with object IDs 34451 and 34452.
- The IoT vendor PSsystec has defined LwM2M objects with IDs 34700, 34718, and 34730.
To trigger sending the READ request to your device, press the Send button. As a result, the downlink message will be placed in the outgoing queue of the Device to Cloud LwM2M Adapter for the device.
The LwM2M communication model between IoT devices and the LwM2M server assumes that many devices, especially so-called LPWAN devices (e.g., those using NB-IoT or LTE-M), spend most of their time in power-saving mode. Therefore, the LwM2M server cannot always communicate with these devices. For this reason, the LwM2M server waits to send the READ request to the device until the device contacts the server again, as this indicates that the device is “awake.” Depending on the device, this can take anywhere from a few minutes to several hours, depending on how the device is configured.
After the LwM2M server delivers the READ request to your device, the device sends all resources of the temperature object 3303 back to Device to Cloud as an Uplink Message. Since you initially assigned your Device and your WebHook Application to a Device Group, the received Uplink Message is forwarded to the URL of your registered WebHook Application as a oneM2M message.
{
    "m2m:sgn": {
        "nev": {
            "rep": {
                "m2m:cin": {
                    "con": {
                        "nodeResourceName": "351516174934489",
                        "time": 1757947903497,
                        "messageType": "response",
                        "method": "read",
                        "path": "/3303",
                        "data": {
                            "3303/0/5601": 25.061416625976562,
                            "3303/0/5602": 25.443273544311523,
                            "3303/0/5603": -20,
                            "3303/0/5700": 25.429922103881836,
                            "3303/0/5604": 60,
                            "3303/0/5701": "°C"
                        },
                        "uplinkProperties":{},
                        "status":{
                          "code": 0,
                          "message": "success"
                        }
                    },
                    "cnf": "application/json:0",
                    "ty": 4,
                    "cs": 273,
                    "st": 9,
                    "cr": "CDevice-Provisioning",
                    "rn": "b3f4d637-11cd-452b-b8a6-8c022745c60b",
                    "ri": "68c82800e104be5e294e047a",
                    "pi": "68c013ab77ff134955934eff",
                    "ct": "20250915T145144,571000",
                    "lt": "20250915T145144,571000"
                }
            },
            "net": 3
        },
        "sur": "d2c-wbv/68c0181613739b8426a709b4"
    }
}
The actual LwM2M resources which have been sent by your device are in the dataValue element. In this sample, the resources of the device’s temperature sensor are returned:
| Object Id | Instance Id | Resource Id | Resource Name | Resource Description |
|---|---|---|---|---|
| 3303 | 0 | 5601 | Min Measured Value | The minimum value measured by the sensor since power ON or reset. |
| 3303 | 0 | 5602 | Max Measured Value | The maximum value measured by the sensor since power ON or reset. |
| 3303 | 0 | 5603 | Min Range Value | The minimum value that can be measured by the sensor. |
| 3303 | 0 | 5604 | Max Range Value | The maximum value that can be measured by the sensor. |
| 3303 | 0 | 5700 | Sensor Value | Last or Current Measured Value from the Sensor. |
| 3303 | 0 | 5701 | Sensor Units | Measurement Units Definition. |
The dataValue element is wrapped by the con element (content). It contains Device to Cloud meta information about the message:
| Element | Description |
|---|---|
| nodeResourceName | ID of the device to which the message is related. |
| time | Unix timestamp when the message has been received. In the sample above, 1757947903497 represents 15.9.2025 14:51:43.497 UTC. |
| messageType | Type of the message. In the sample above, it is set to response because the message is the result of READ request. Possible values are response, notify, registration, de-registration, registration-update, registration-expire |
| path | Resource path |
| data | Payload data of the message |
| method | Method which triggered the message. Possible values are: read, write, execute, observe, notify |
| status.code | Result code of the operation. 0 means that operation could be successfully performed |
| status.message | Text of the result code. The code 0 has the text “success” |
| uplinkProperties | Map of key/value pairs which have been configured for the device as uplink properties |
| Short name | Long name | Description |
|---|---|---|
| cnf | contentInfo | Specifies the content format and serialization of the payload (here: application/json with encoding 0) |
| ty | resourceType | Type of the oneM2M resource (4 = contentInstance - a data instance) |
| cs | contentSize | Size of the content in bytes (here: 273 bytes) |
| st | stateTag | Version number/tag of the resource for synchronization and caching |
| cr | creator | Creator/author of the resource (here: “CDevice-Provisioning”) |
| rn | resourceName | Unique name of the resource within the parent container |
| ri | resourceID | Unique system ID of the resource in the oneM2M infrastructure |
| pi | parentID | ID of the parent resource (parent container) |
| ct | creationTime | Timestamp of creation in ISO 8601 format |
| lt | lastModifiedTime | Timestamp of the last modification in ISO 8601 format |
| net | notificationEventType | Type of event that triggered the notification (3 = Update of a child resource) |
| sur | subscriptionReference | Reference to the subscription that triggered this notification |
Write LwM2M resources
To get started with updating LwM2M resources on your device, let’s change the Lifetime of your device’s LwM2M registration. The Lifetime is a value in seconds stored in the LwM2M resource /1/0/1 on the device. It defines how often the device updates its registration, like a heartbeat. This resource can be both read (READ) and written (WRITE).
Similar to the READ example described above, open the Send message to LwM2M device dialog. However, this time, select WRITE as the method (in very early versions of Device to Cloud, the WRITE method is called PUT).
Write LwM2M Lifetime intervall in seconds on device
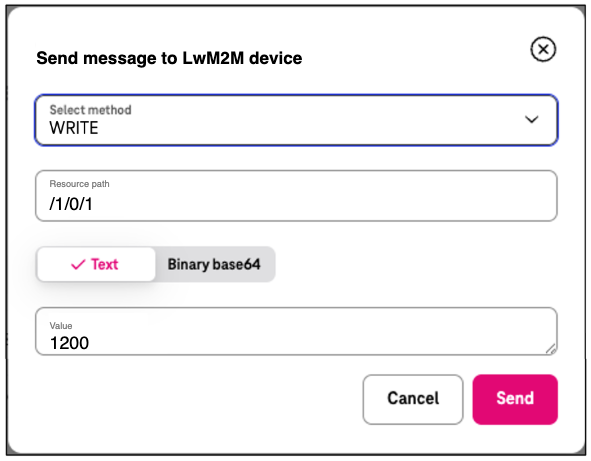
Enter /1/0/1 for Resource path and 1200 for Value. This corresponds to a Lifetime of 1,200 seconds, which is 20 minutes.
👉 Future version of Device to Cloud: write multiple resources with structured input value.
You can send the message to the device by clicking Send.
Be aware, that the message is not sent directly to the device but is placed in the outgoing queue of the device in the LwM2M protocol adapter of Device to Cloud. The message will be delivered to the device the next time the device contacts the LwM2M protocol adapter, for example, during a registration update.
After the WRITE request has been delivered to the device, it responds with the following message to your application via Device to Cloud
{
  "m2m:sgn": {
    "nev": {
      "rep": {
        "m2m:cin": {
          "con": {
            "nodeResourceName": "rba1000001",
            "time": 1758207887952,
            "messageType": "response",
            "method": "write",
            "path": "/1/0/1",
            "uplinkProperties":{},
            "status":{
              "code": 0,
              "message": "success"
            }
          },
          "cnf": "application/json:0",
          "ty": 4,
          "cs": 119,
          "st": 10,
          "cr": "CDevice-Provisioning",
          "rn": "41b6f144-0811-4351-a46c-bd725f76bed0",
          "ri": "68cc1f907c19561f57dc5306",
          "pi": "68bedd8077ff134955934ebb",
          "ct": "20250918T150448,973000",
          "lt": "20250918T150448,973000"
        }
      },
      "net": 3
    },
    "sur": "d2c-wbv/68c96df4e104be5e294e04cc"
  }
}
To verify if the Lifetime has been configured correctly on your device, you can simply perform a READ operation on the resource /1. The asynchronous response of the device to your application’s WebHook should look like below. You can see value of 1200 in the element 1/0/1.
{
  "m2m:sgn": {
    "nev": {
      "rep": {
        "m2m:cin": {
          "con": {
            "nodeResourceName": "351516174934489",
            "time": 1758206334440,
            "messageType": "response",
            "method": "read",
            "path": "/1",
            "data": {
              "1/0/0": 1,
              "1/0/1": 1200,
              "1/0/2": 0,
              "1/0/3": 0,
              "1/0/6": true,
              "1/0/7": "U",
              "1/0/23": false
            },
            "uplinkProperties":{},
            "status":{
              "code": 0,
              "message": "success"
            }
          },
          "cnf": "application/json:0",
          "ty": 4,
          "cs": 200,
          "st": 17,
          "cr": "CDevice-Provisioning",
          "rn": "1b432067-5264-4ceb-8818-74b36d1c4a87",
          "ri": "68cc197fa1c9264fdabcbf8b",
          "pi": "68c013ab77ff134955934eff",
          "ct": "20250918T143855,465000",
          "lt": "20250918T143855,465000"
        }
      },
      "net": 3
    },
    "sur": "d2c-wbv/68c96df4e104be5e294e04ce"
  }
}
Execute LwM2M Resources
To perform a function on your device, you will use the LwM2M operation EXECUTE on the corresponding LwM2M resource on your device. The simplest operation you can perform on your device is a Reboot using the LwM2M resource /3/0/4.
Similar to the WRITE example described above, open the Send message to LwM2M device dialog. However, this time, select EXECUTE as the method (in very early versions of Device to Cloud, the EXECUTE method is called POST).
Reboot device by executing LwM2M resource /3/0/4
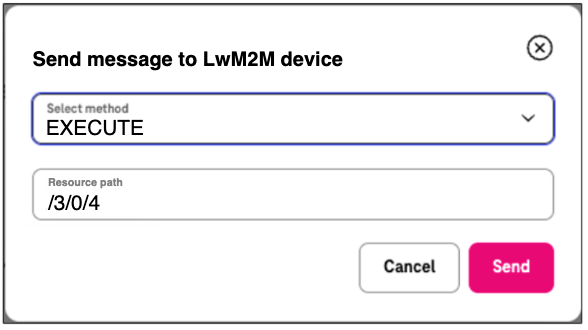
Enter /3/0/4 for Resource path.
👉 Future version of Device to Cloud: support of operation arguments.
You can send the message to the device by clicking Send.
Be aware, that the message is not sent directly to the device but is placed in the outgoing queue of the device in the LwM2M protocol adapter of Device to Cloud. The message will be delivered to the device the next time the device contacts the LwM2M protocol adapter, for example, during a registration update.
After the EXECUTE request has been delivered to the device, it responds with the following message to your application via Device to Cloud
{
  "m2m:sgn": {
    "nev": {
      "rep": {
        "m2m:cin": {
          "con": {
            "nodeResourceName": "351516174934489",
            "time": 1758283176648,
            "messageType": "response",
            "method": "execute",
            "path": "/3/0/4",
            "uplinkProperties":{},
            "status":{
              "code": 0,
              "message": "success"
            }
          },
          "cnf": "application/json:0",
          "ty": 4,
          "cs": 119,
          "st": 17,
          "cr": "CDevice-Provisioning",
          "rn": "b9d7e795-979b-4402-9be9-a022776d90bb",
          "ri": "68cd45a97c19561f57dcc13e",
          "pi": "68bedd8077ff134955934ebb",
          "ct": "20250919T115937,724000",
          "lt": "20250919T115937,724000"
        }
      },
      "net": 3
    },
    "sur": "d2c-wbv/68c96df4e104be5e294e04cc"
  }
}
Since the reboot forces the device to perform a registration at the LwM2M server of Device to Cloud during the startup, you should also see the registration notification in your WebHook Application.
{
  "m2m:sgn": {
    "nev": {
      "rep": {
        "m2m:cin": {
          "con": {
            "nodeResourceName": "351516174934489",
            "time": 1758284537359,
            "messageType": "registration",
            "method": "registration",
            "uplinkProperties":{},
            "status":{
              "code": 0,
              "message": "success"
            }
          },
          "cnf": "application/json:0",
          "ty": 4,
          "cs": 83,
          "st": 33,
          "cr": "CNI-IPE",
          "rn": "8d802044-f2da-4ea4-b6db-2dc72cf2e3c8",
          "ri": "68cd4afa4af1d7e1dfcb7d3a",
          "pi": "68c94104de3b5f1f5ffb6dfb",
          "ct": "20250919T122218,436000",
          "lt": "20250919T122218,436000"
        }
      },
      "net": 3
    },
    "sur": "d2c-dev-1/68cd4aa24af1d7e1dfcb7d28"
  }
}
Monitor device traffic
In the Overview subpage of the web GUI you can see metric graphs:
- message count received from the device, and
- message count sent to the device
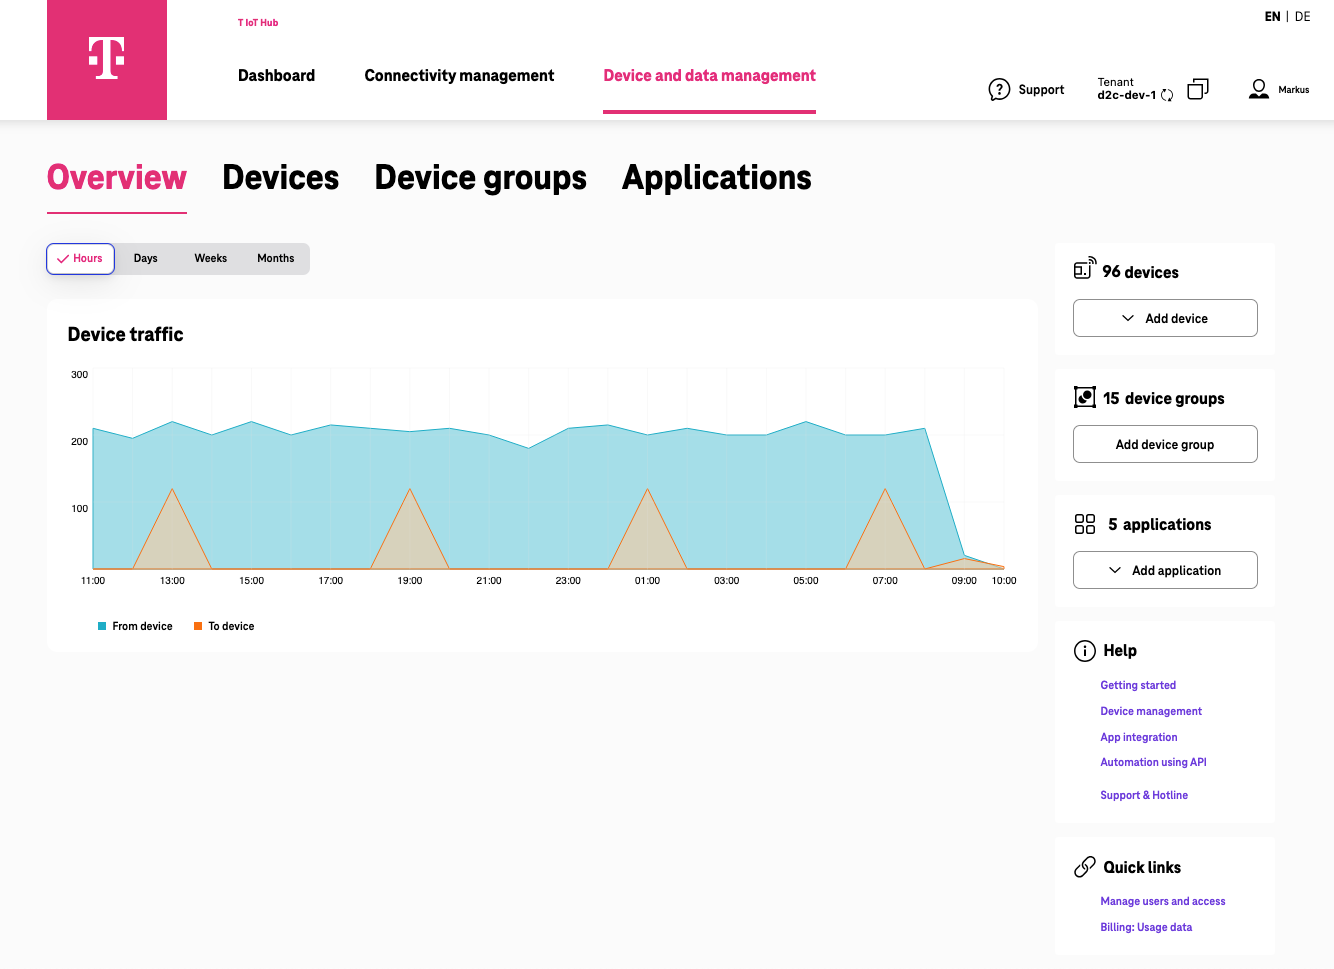
E.g. when you send “Write” or “Execute” messages to the device, you should see them in the “sent” metric.
Depending on your IoT use case, you can use these metrics to monitor system health.