Device to Cloud Getting Started Onboard Lwm2m Devices Step by step
Introduction
This chapter describes how you can onboard your LwM2M device to Device to Cloud.
To onboard a LwM2M device to Device to Cloud perform the following steps:
- Register the device in the device inventory and LwM2M server of Device to Cloud
- Configure your LwM2M device for Device to Cloud
- Verify if your LwM2M device can connect to the LwM2M server of Device to Cloud
The second step is performed on your LwM2M device and depends heavily on the type of device and it’s manufacturer. The way to configure the LwM2M settings on devices, such as server name, server ports, or LwM2M registration interval is different for each manufacturer. Some manufacturers provide a smartphone app for their devices, allowing configuration using NFC. Other manufacturers require transferring a configuration file from a local computer to the device via a serial interface.
To guide you in configuring various, commercially available LwM2M devices for Device to Cloud, we have included descriptions for different devices in the section Configure LwM2M device for .
👉 Future version of Device to Cloud will support LwM2M bootstrapping service.
Register LwM2M device with Device to Cloud
As described above, a LwM2M device to be integrated with Device to Cloud must be registered in the device inventory and the LwM2M server of Device to Cloud. The interactive steps required for this registration using the Device to Cloud web application are outlined below.
Step 1:
Open Device to Cloud service in IoT Hub
To register a new LwM2M device with Device to Cloud, log in to the IoT Hub at https://hub.iot.telekom.com and navigate to the Device to Cloud service. To do so, you can either use the tile Data Provisioning on the landing page of the IoT Hub, or navigate to https://hub.iot.telekom.com/d2c/en with your browser.
Step 2:
Open the Add LwM2M device dialog and define device details
In the Overview tab of the Device to Cloud web application, click the Add device button. A list of supported IoT procols drops down. Click on LwM2M to open the Add LwM2M device dialog.
Overview tab of web application

Add LwM2M device dialog

The following information is required for a LwM2M device as a minimum:
| Field | Description |
|---|---|
| Device ID | The unique identifier used in the LwM2M registration process of the device. Typically, this is the device’s IMEI or serial number. Possible characters are: A-Z, a-z, 0-9, -, _ |
| PSK ID | For device security the id of the pre shared key (PSK) for the DTLS layer. Normally you can use the Device ID above as PSK ID. |
| PSK Secret (base64) | For device security the secret of the PSK for the DTLS layer. Make sure the key is encoded as a base64 string. |
For many devices, the PSK secret is a binary value and the manufacturer provides it as hex string to you. Since Device to Cloud requires the PSK secret as a base64 encoded string you can convert the binary secret from hex encoding to base64 encoding with the commands:echo "<hex string>" | xxd -r -p | base64.
This commands decode the secret from hex via its original raw version and codes it directly into base64.
If you don’t have those command available on your machine you can also use an online tool such as https://base64.guru/converter/encode/hex .
Online tool to convert hex to base64

All other input fields which are described below are optional and can be ignored for the time being.
For the IoT protocol LwM2M, the optional fields can be divided into the User-Defined and Device-Defined fields. You can modify the User-Defined fields using the Device to Cloud web application or the Device to Cloud API anytime. The Device-Defined fields, however, are provided by the device through the LwM2M protocol and are updated every time the device sends the LwM2M object 3 (device) to the LwM2M server of Device to Cloud. This means that even if you set values for the Device-Defined fields during the initial creation of the LwM2M device, these values will be overwritten during the next communication between the device and the LwM2M server of Device to Cloud.
| User-Defined device field | Description |
|---|---|
| Device name | Custom name or identifier of the device which helps the user work with the devices. Device name doesn’t need to be unique. |
| Device properties | Any number of key/value pairs to characterize or classify the device. |
| Uplink message properties | Any number of key/value pairs which are sent along with every uplink message to the registered application. |
| Groups. | List of Device Groups the device is assigned to. Device Groups link a device to one or more applications. Uplink messages of a device are forwarded to the applications which are assigned to the same Device Group. |
| Device-Defined device field | Description | LwM2M source resource |
|---|---|---|
| Manufacturer | Manufacturer of the device | /3/0/0 |
| Model | Model of the device | /3/0/1 |
| Device type | Type of the device | /3/0/17 |
| Hardware version | Hardware version of the device | /3/0/18 |
| Firmware version | Firmware version of the device | /3/0/3 |
| Software version | Software version of the device | /3/0/19 |
| Location | Location of the device according to scheme of RFC 5870 https://en.wikipedia.org/wiki/Geo_URI_scheme Sample: “geo:52.5162,13.3777” | latitude: /6/0/0, longitude: /6/0/1 |
Step 3:
Confirm creation of LwM2M device
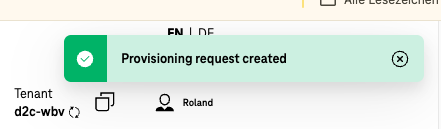
After you have entered at least the Device ID, the PSK ID, and the PSK Secret, you can click the Add device button located at the bottom right of the Add LwM2M device dialog. If there are no input errors, a green confirmation window will be displayed at the top right of the browser screen (see below).
Confirmation that the creation of the LwM2M device has been successfully initiated
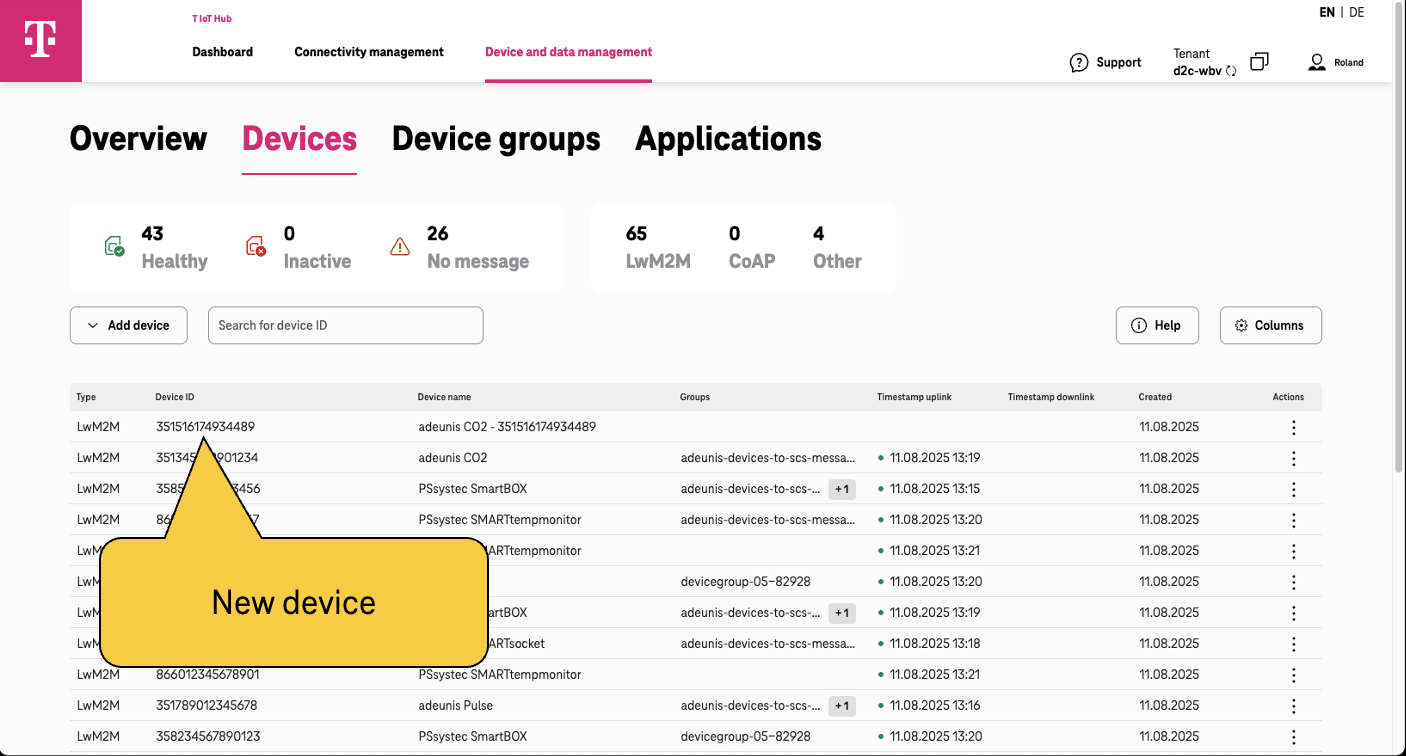
Once you have closed the confirmation window, you can change to the Devices tab in the home screen of Device to Cloud web application, and see your newly created LwM2M device (see figure below).
Devices tab with list of devices
Configure LwM2M device for Device to Cloud
Device to Cloud Configuration parameters
After successfully registering your LwM2M device in Device to Cloud, the next step is to configure your device so that it can communicate with the LwM2M server of Device to Cloud.
The way your device is configured depends on its manufacturer. Each manufacturer has its own approach to configuring the basic communication parameters of IoT devices. Some manufacturers provide additional smartphone apps available in the Google Play Store or Apple App Store, which allow IoT devices to be configured via NFC. Other manufacturers require a configuration file to be uploaded to the device via a serial interface. In the latter case, the format of the configuration file is manufacturer-specific.
Regardless of the method you have to use, you will need to set the following Device to Cloud specific parameters to connect to the LwM2M server.
| Parameter name | Parameter Value | Description |
|---|---|---|
| DTLS URI of LwM2M server | lwm2m.scs.iot.telekom.com:5684 | The DTLS encrypted coap interface of LwM2M server. Sample: coaps://lwm2m.scs.iot.telekom.com:5684 |
| PLMN ID | e.g. 26201 for Telekom in Germany | Public Land Mobile Network id of the mobile operator. For some devices it is not required since they read the info automatically from the SIM card. See Network Roaming Info for PLMN IDs of other mobile operators and other countries. |
| Frequency Band | e.g. 8 for NB-IoT of Telekom in Germany e.g. 20,3 for LTE-M of Telekom in Germany | Frequency band of the NB-IoT or LTE-M network the device shall use. The frequency band is specific for every mobile operator in every country. For some devices, it is not required, since they read the info automatically from the SIM card. See Network Roaming Info for frequency bands of other mobile operators and other countries. |
| APN | e.g. internet.m2mportal.de for Telekom | Name of the Access Point through which the device can access the mobile network. For some devices, it is not required, since they read the info automatically from the SIM card. |
Device-specific Device to Cloud configuration
As mentioned above, the configuration of LwM2M devices varies greatly depending on the manufacturer. For this reason, it is not possible to provide a general description of device configuration in a Get Started guide like this. To still support you in setting up an NB-IoT/LwM2M device, we have provided detailed configuration examples for devices from some manufacturers.
| Device | Description |
|---|---|
| adeunis SERENITY | NB-IoT LwM2M CO2 and VOC sensor from adeunis . |
Verify connection between LwM2M device and Device to Cloud
In the previous sections, you have registered your LwM2M device in Device to Cloud and configured it to connect to the LwM2M server of Device to Cloud. The next step is to verify whether your device can actually connect to Device to Cloud.
Typically, your device should automatically connect to the mobile network after being powered on and initiate the so-called LwM2M Client Registration Process with the LwM2M server of Device to Cloud. During these processes, most IoT devices indicate errors by blinking red LEDs and success by blinking green LEDs.
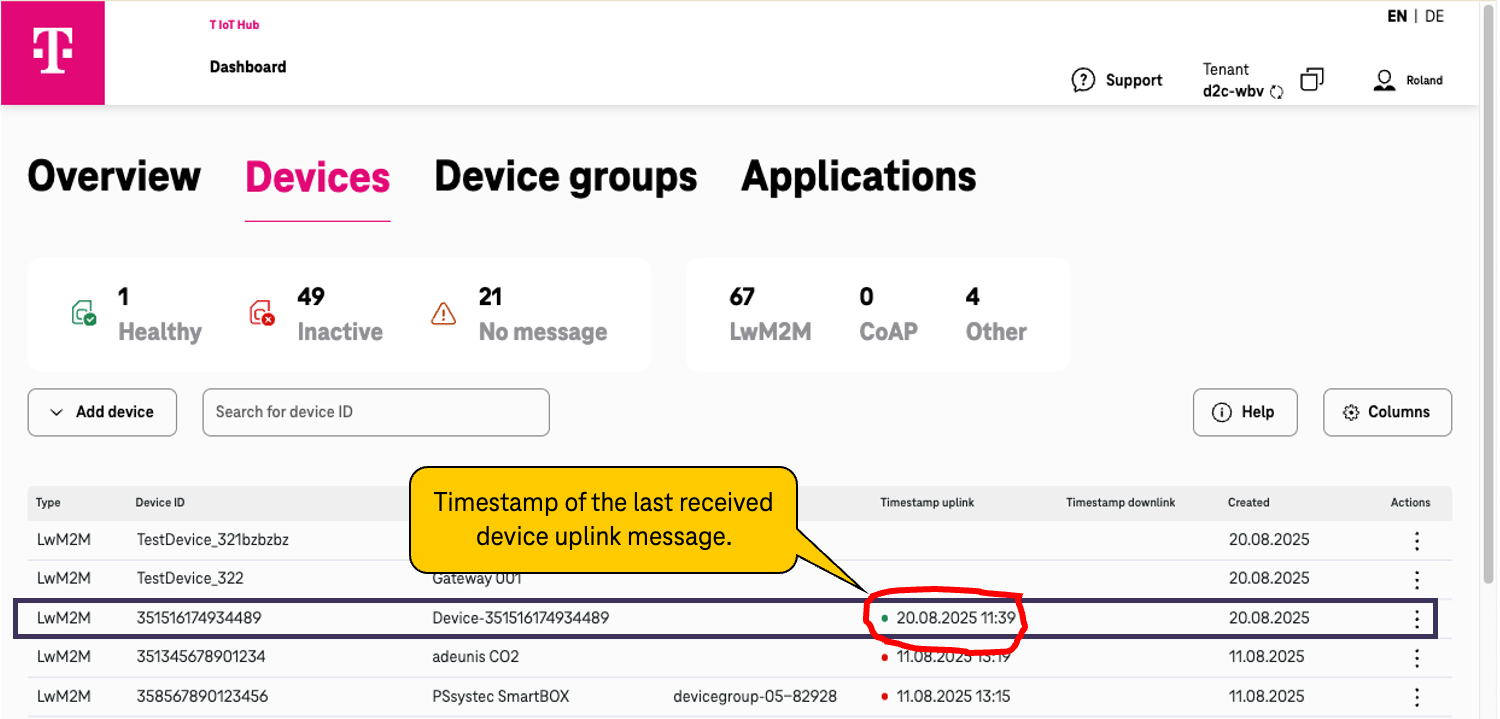
The LwM2M Client Registration Process results in a registration message being received as an Uplink Message by Device to Cloud, which is displayed with its timestamp in the Device to Cloud web application (see image).
GUI with list of devices and the timestamp of the last received message