APIs Get started
Connecting your application to the T IoT Hub
This tutorial will guide you through the initial steps of using the Connection Management Orchestrator (CMO) and Device Management Orchestrator (DMO) APIs.
You will learn how to
- Register your application to retrieve client credentials in the Application access management.
- Retrieve an access token (via the
curlcommand that simulates your own application for simplicity in this getting started tutorial). - Access the protected CMO and DMO API (also via
curlcommand).
Prerequisites
Before we begin, make sure that:
- You possess a T IoT Hub Account with an Admin role since only administrators have access to the T IoT Hub Application access management.
- You have the
curl(cURL ) andjq(jq ) command line tools installed
- This tutorial will refer to the use of cURL. If you use a different platform, the setup might vary.
- The curl converter can be helpful to translate the described cURL examples into other programming languages.
Step 1. Register your application in the Application access management
To enable your own application to access the T IoT Hub CMO- and DMO APIs, you first have to register your application on the T IoT Hub Application access management page.
- In the website header, click on [your name].
- Click on Application access management.
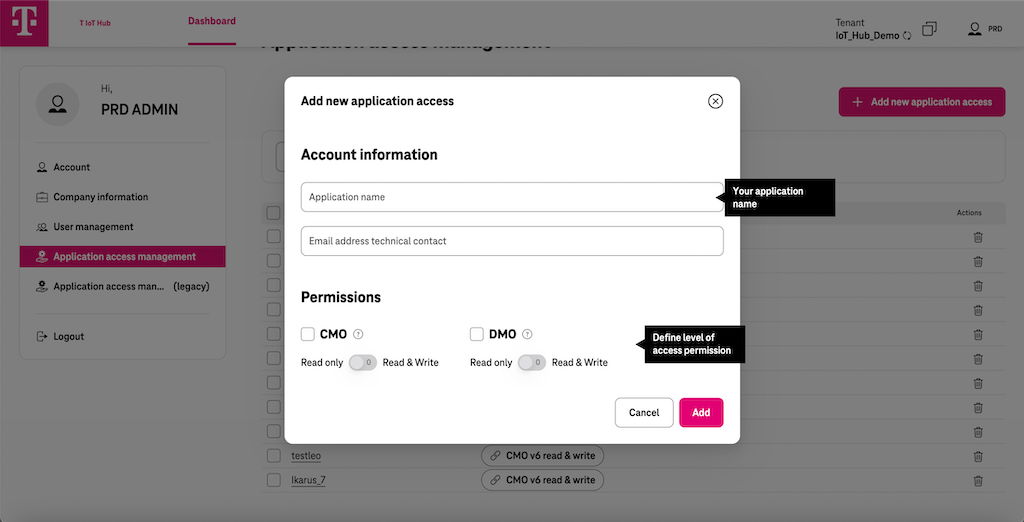
- In the Application access management, click on Add new application access.
- Enter an Application name (Nickname for your app) and enter the email of the person responsible for the Application.
- Select the permissions you want the application to access.

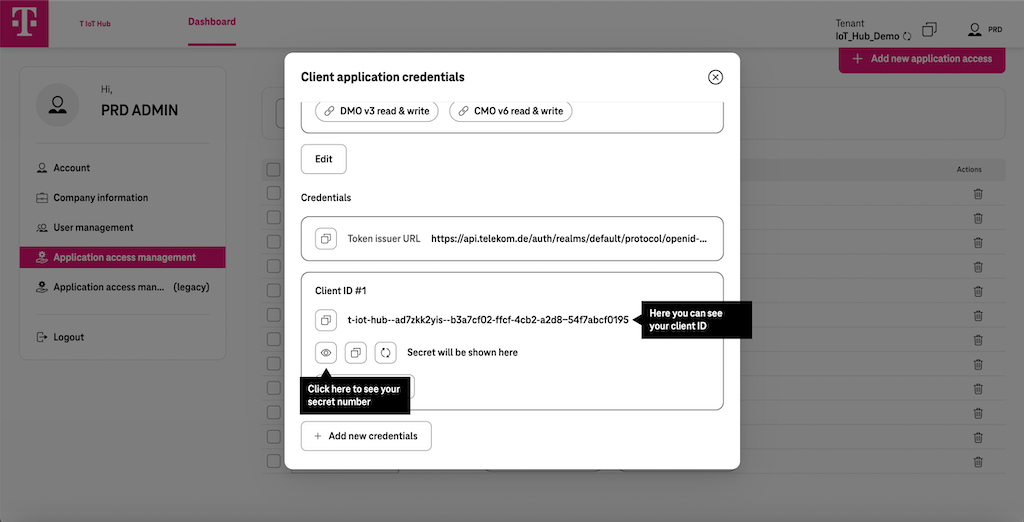
Once you successfully registered your application, you should have a Client ID
<your_client_id>and a Client Secret<your_client_secret>.To view your client credentials, click on the Application Name.

Step 2. Retrieve an access token
Your application needs to retrieve an access token to send authorized requests and interact with the protected CMO- and DMO APIs. We simulate your application in a simplified way using cURL. To check if cURL is installed on your hardware, open a Terminal or CMD and run:
curl --version
- The access token has an expiration time of 300 seconds (5 minutes). If you get error 401 when trying to make a request, this is most likely an expired token.
- Your application should cache the access token after receiving it and use it until it is expired. Only then should your application request a new access token from the T IoT Hub token endpoint. Please do not request a new access token before each API call. This slows down your application unnecessarily and creates a higher load, which also affects your rate limits.
- It is recommended to use OAuth2 libraries, which usually implement logic like the caching of the access token and the reloading if it is expired.
- If your application is constantly fetching new access tokens while the old one is still valid the T IoT Hub will deny your application’s access for a while or will block it.
- First, open the CMD line or your preferred HTTP client.
- Set up the API endpoints with the following cURL command and replace the values of
<your_client_id>and<your_client_secret>with your data.
- Copy & paste
- Output
# Replace <token_issuer_url> below with Token Issuer URL
AUTH_URL="<token_issuer_url>"
# Replace <your_client_id> below with your Client ID
CLIENT_ID="<your_client_id>"
# Replace <your_client_secret> with your Client Secret
CLIENT_SECRET="<your_client_secret>"

curl --request POST --location "$AUTH_URL" \
  --header 'Content-Type: application/x-www-form-urlencoded' \
  --data-urlencode "client_id=$CLIENT_ID" \
  --data-urlencode "client_secret=$CLIENT_SECRET" \
  --data-urlencode 'grant_type=client_credentials'
{
  "access_token": "eyJhbGciOiJSUzI1NiIsInR5cCIgO...HFWMlinw",
  "expires_in": 300,
  "refresh_expires_in": 0,
  "token_type": "Bearer",
  "not-before-policy": 0,
  "scope": "email profile"
}
- For the machine to machine use case described here, the client credentials grant type used on T IoT Hub does not issue refresh tokens. Since you have configured the client credentials in your application, it can fetch a new access token after the currently used and cached access token has expired.
Step 3. Access the API
The following examples show how to access the protected API. There is an example for Connectivity Management Orchestration (CMO) and an example for Device Management Orchestration (DMO).
- Before executing any script mentioned in our documentation pages, ensure you replace the placeholder text within the angle brackets (<>) with the appropriate values for the variables (also described in the comments)
API_URL: The corresponding URL for each API can be found on the Application Access Management
API URLs in the reference examples use Base URL of each service appended by the Tenant name. ( API_URL = BaseURL + Tenant )
Example for CMO API_URL is:
https://api.telekom.de/t-iot-hub/connection-management-orchestrator/v6/DemoTenant
API URL can be easily copied to clipboard via the corresponding copy or chain icons on our UI
Accessing CMO API
The following example shows how you can use the CMO API to query the ids of 3 products (e.g. of SIM cards) assigned to your tenant.
- Copy & paste
- Output
# Replace <cmo_api_url> below with the CMO API URL
# (click chain/copy icon in Application Management UI to copy API_URL to clipboard)
# API_URL = BaseURL(including version) + TenantName
API_URL="<cmo_api_url>"
# Copy the "access_token" from the previous script's response and replace the <access_token> here:
ACCESS_TOKEN="<access_token>"

curl --request GET --location "$API_URL/product?pageSize=3&fields=id" \
  --header 'Accept: application/json' \
  --header "Authorization: Bearer $ACCESS_TOKEN"
{
  "entities": [
    {
      "id": "JASPER-<some_id>"
    },
    {
      "id": "JASPER-<some_id>"
    },
    {
      "id": "TMUS-<some_id>"
    },
    {
      "id": "AIRLINQ-<some_id>"
    },
    {
      "id": "AIRLINQ-<some_id>"
    },
    {
      "id": "STC-<some_id>"
    }
  ],
  "errors": [
  ],
  "statistics": {
    "currentPage": 1,
    "pageSize": 3
  },
  "links": [
    {
      "type": "self",
      "url": "<cmo_api_url>/product?pageSize=3&fields=id"
    }
  ]
}
Accessing DMO API
The following examples shows you how to use the Device Management Orchestrator (DMO) API of IoT Hub. This API allows IoT applications to manage devices and access their data, highly independent of the underlying protocol and technology used by the devices. DMO API is based on the oneM2M standard and manages IoT related entities based on the resource model of oneM2M. It supports a variety of resource types, which are used to represent the different aspects of devices, their applications, payload and connectivity data. The first time your application uses the DMO API, it has to register itself by creating an application entity (AE) resource to represent the application. The request below shows how you can do that.
"api": Type of your application. The type has to start with “N”"rn": Enter a name for your application. For detailed information about all query parameters please check DMO API in Swagger
- Copy & paste
- Output
# Enter the Name of your application entity. The prefix "C" is needed.
APP_ORIGIN="C<your_app_origin>"
# Copy the "access_token" from above response
ACCESS_TOKEN="<access_token>"
# Replace <api_url> below with the DMO API URL this time (click chain icon next to DMO in Application Management UI to copy it to clipboard)
# eg. https://api.telekom.de/t-iot-hub/device-management-orchestrator/v3
API_URL="<dmo_api_url>"

curl --request POST --location "$API_URL" \
  --header 'Content-Type: application/json;ty=2' \
  --header "X-M2M-Origin: $APP_ORIGIN" \
  --header 'X-M2M-RI: 123' \
  --header 'Accept: application/json' \
  --header "Authorization: Bearer $ACCESS_TOKEN" \
  --data '{
    "m2m:ae": {
        "api": "N<your_application_type>",
        "rn": "<your_application_name>"
    }
}'
{
    "m2m:ae": {
        "api": "NTest",
        "rn": "TestApp",
        "ty": 2,
        "ri": "6482e3935b243e17db6ad715",
        "aei": "CAppTest",
        "pi": "<your_tenant_name>",
        "ct": "20230609T083219,210000",
        "lt": "20230609T083219,210000"
    }
}
- Status code “201 created” means you registered your application entity successfully.
The Application ID you create during application registration is the ID you must use in the X-M2M-Origin header of all subsequent requests to the DMO API. Otherwise, the system will reject your request. This is important because DMO API must “know” the application using it for every request.
Complete script for fetching and using an access token
Below you will find a complete bash script. Before executing, please make sure that you have the jq command line tool installed, which is required to execute the script.
- Copy & paste
#!/bin/sh

# Example of Getting Products using CMO API
# TODO: Please replace the values in brackets below before executing this script
# You can easily copy/paste those from the Application Management UI

# Replace with token Issuer URL
AUTH_URL="<token_issuer_url>"
# Replace with your Client ID
CLIENT_ID="<your_client_id>"
# Replace with your client secret
CLIENT_SECRET="<your_client_secret>"
# Replace with CMO API URL (click chain icon to copy it from application management UI)
API_URL="<cmo_api_url>"

##### FUNCTIONS ##############################################################

_get_access_token () {
    curl --request POST --location "$AUTH_URL" \
        --header 'Content-Type: application/x-www-form-urlencoded' \
        --data-urlencode "client_id=$CLIENT_ID" \
        --data-urlencode "client_secret=$CLIENT_SECRET" \
        --data-urlencode 'grant_type=client_credentials' -s
}

_get_products () {
    curl --request GET --location "$API_URL/product?pageSize=3" \
        --header 'Accept: application/json' \
        --header "Authorization: Bearer ${1}" -s
}

##### RUN ####################################################################

echo "Request an access token"
echo "----"
echo ""
ACCESS_TOKEN=`_get_access_token | jq -r .access_token`

echo "Call T IoT Hub CMO REST API"
echo "----"
echo ""
_get_products $ACCESS_TOKEN | jq